Ever wondered how to make a tool in Roblox Studio that truly stands out? This ultimate guide is your blueprint for creating custom interactive tools, from simple weapons to complex utility items, enhancing your game with unique mechanics and engaging player experiences. Dive deep into the world of Lua scripting, understand the nuances of CFrame manipulation, and master event handling to bring your innovative tool ideas to life. We will cover everything from basic item creation to advanced functionality, ensuring your tools are not just functional but also fun and impactful. This resource will help you navigate common challenges and leverage Roblox's powerful engine to design tools that captivate your audience, making your game a trending hit. Discover how top developers craft their in-game items, providing inspiration and practical tips to elevate your own projects. Get ready to unleash your creativity and build the next big thing on Roblox.
Welcome to the ultimate living FAQ about how to make a tool in Roblox, updated for the latest Studio patches and development practices! This comprehensive guide is designed to cut through the noise and provide clear, actionable answers to your most pressing questions about creating custom tools. Whether you're a beginner just learning to script or an experienced developer looking for advanced tips, we've got you covered. From basic item setup to complex interactive mechanics, we'll explore every facet of tool development, ensuring your creations are not only functional but also engaging and trend-setting. Dive in and discover how to craft the perfect tool for your Roblox game, making it truly shine.
Understanding the ins and outs of tool creation is essential for any aspiring Roblox developer. We've gathered insights from community forums, official documentation, and top creators to compile this resource. Our goal is to empower you with the knowledge and confidence to build anything you can imagine, transforming your game ideas into reality. This FAQ covers common pitfalls, creative solutions, and best practices that will save you countless hours of troubleshooting. Get ready to elevate your Roblox development skills to the next level.
Most Asked Questions about How to Make a Tool Roblox
Beginner Questions
What is the absolute first step to making any tool in Roblox Studio?
The very first step is to open Roblox Studio, create a 'Part' in your workspace, and then insert a 'Tool' object into 'StarterPack'. Drag your 'Part' inside the 'Tool' and name it 'Handle'. This 'Handle' is crucial as it's the part your character will physically hold. You can then begin adding scripts for functionality.
How do I make my tool appear in the player's inventory when they join the game?
To ensure your tool appears in a player's inventory automatically, simply place the 'Tool' object (containing its 'Handle' and any scripts) directly into the 'StarterPack' service within the Explorer window. Roblox Studio handles the rest, providing the tool to players on spawn and respawn.
Builds & Classes
How can I create a unique sword tool with custom animations and attack effects?
To build a custom sword, first model its 'Handle' and blade parts, welding them together. Add an 'Animation' instance with your attack animation ID inside the tool. Use a 'LocalScript' to play the animation on `tool.Activated` and communicate with a 'Server Script' via 'RemoteEvent' to handle damage, raycasting for hits, and visual effects like sparks, ensuring security.
What's the best approach for making a building tool that places objects in the game world?
A building tool typically uses `mouse.Hit.Position` from a 'LocalScript' to determine where to place objects. Send this position to a 'Server Script' via a 'RemoteEvent' which then clones a pre-made 'Model' from 'ServerStorage' and places it there. Implement client-side visual previews for a smoother user experience.
Multiplayer Issues
My tool works in single-player but breaks in multiplayer. What usually causes this?
This often happens when critical game logic is handled by 'LocalScripts' instead of 'Server Scripts'. For multiplayer functionality, server scripts must validate all player actions (e.g., damage, item creation). 'LocalScripts' should only handle client-side visuals, using 'RemoteEvents' to communicate with server scripts for universal changes.
Endgame Grind
How can I implement a tool upgrade system where players can improve their tools over time?
An upgrade system requires 'DataStoreService' to save tool stats. When a player upgrades a tool (client-side UI interaction), a 'Server Script' processes the upgrade, updates the tool's properties (e.g., damage, speed), and then saves these new stats to the player's data. When the player rejoins, the server script loads these stats and applies them to the tool.
Tips & Tricks
What are some pro tips for optimizing tool performance and reducing lag in my game?
Optimize tools by using 'LocalScripts' for client-only visual effects, minimizing complex physics calculations, and implementing cooldowns or debounces on activated events. Avoid excessive instance creation or destruction without proper cleanup. Use efficient welding methods to keep parts together, reducing physics overhead.
How can I ensure my tools feel responsive and satisfying for players to use?
Responsiveness comes from combining instant client-side feedback (animations, sound effects via 'LocalScripts') with efficient server-side validation. Use 'TweenService' for smooth movements and avoid unnecessary delays. Test frequently to find the right balance between visual flair and solid functionality, making every interaction feel impactful.
Still have questions? Check out our guides on 'Advanced Lua Scripting for Roblox' or 'Designing Engaging Roblox Game Mechanics' for more in-depth knowledge!
Roblox tool creation, at its core, is about giving players new ways to interact with your digital world. It's not just about coding; it's about imagining what kind of actions or powers you want to grant them. Think of it like a game designer's superpower – you get to decide how players will explore, build, fight, or even just express themselves within your experience.
From a simple clickable object to a complex system that builds entire structures, every tool starts with an idea and a 'Handle'. The real magic happens when you infuse that idea with Lua scripting, turning a static object into a dynamic part of your game's ecosystem. It's a journey of continuous learning, tweaking, and testing, but the payoff of seeing players enjoy your custom creations is incredibly rewarding.
So, dive in, experiment, and don't be afraid to make mistakes – that's how everyone learns! The ability to craft unique tools is one of the most powerful skills you can develop in Roblox Studio, allowing you to create truly memorable and trend-setting experiences for millions of players worldwide. What will you empower your players to do today?
Have you ever asked yourself, 'How do I even begin to make a tool in Roblox?' It's a common thought for many aspiring game creators. Creating tools in Roblox can feel like a superpower, enabling players to interact with your world in amazing ways, from wielding a powerful sword to building structures with a magic wand. This journey into Roblox tool creation is not just about making an item; it's about crafting an experience. We are going to explore the core principles and advanced techniques that top developers use to bring their wildest tool ideas to life in Roblox Studio, ensuring your creations are both functional and incredibly fun for players.
Understanding the fundamental concepts of Roblox Studio is your first crucial step. The platform offers a robust environment for building virtually anything you can imagine. Learning how to properly set up your workspace and utilize the Explorer and Properties windows efficiently will make your tool-making process much smoother. Many developers often overlook these basics, leading to avoidable headaches later on. Let us ensure your foundation is solid before we start building something truly spectacular for your game world.
Lua scripting is the heart and soul of interactive tools on Roblox. This powerful yet accessible language allows you to define exactly how your tool behaves, what it does when activated, and how it responds to player input. Mastering Lua means unlocking endless possibilities for unique gameplay mechanics. We will dive into how to write clean, efficient, and secure scripts that make your tools responsive and bug-free, ensuring a smooth experience for every player who picks it up.
The current year's trends in Roblox game development emphasize highly interactive and visually appealing tools. Players expect more than just basic functionality; they crave immersive experiences. This means paying attention to details like custom animations, sound effects, and unique visual feedback when a tool is used. Implementing these elements can dramatically elevate the perceived quality of your game. Focusing on these details will help your game stand out in the bustling Roblox marketplace and attract a dedicated player base.
Creating a Roblox tool isn't just about functionality; it's about player engagement. A well-designed tool can define the core gameplay loop, encourage exploration, or even facilitate social interaction. Thinking about how players will use your tool and what emotions it will evoke is paramount. We will look at examples from popular Roblox games to draw inspiration, understanding what makes certain tools iconic and universally loved by the community. You have the power to create something memorable.
Beginner / Core Concepts
- Q: How do I even get started with making a basic tool in Roblox Studio for my game?
- Q: What's the 'Handle' in a Roblox tool, and why is it so important for my creations?
- Q: Can I make a tool without any scripting in Roblox Studio, or is Lua always necessary?
- Q: Where should I place my tool in Roblox Studio so players can access it in-game?
A: Hey there, I totally get why this can feel like a mountain to climb when you're just starting! The best way to jump in is by opening Roblox Studio and creating a new place. From there, you'll want to insert a Part into your workspace – this will be the visual representation of your tool. Then, super important, you'll put a 'Tool' object into your 'StarterPack' in the Explorer window. Inside that 'Tool' object, you'll drag your 'Part'. Remember to name the Part 'Handle' (with a capital H) or ensure 'CanBeDropped' is false for the tool itself. This 'Handle' is how Roblox knows what the player grabs. You're basically building the foundational structure. This initial setup is key, as it tells Roblox what the player will actually hold and use. Don't sweat the scripting yet; just get that basic physical item ready. You've got this!
A: Ah, the 'Handle'! This one used to trip me up too, so you're not alone. Think of the 'Handle' as the actual physical part of your tool that the player's character will grip. It's crucial because Roblox Studio automatically attaches the tool to the player's hand via this specific part. If your tool doesn't have a part named 'Handle' directly inside the 'Tool' object, it won't be held correctly or at all when picked up in-game. It acts as the anchor point for the animation and interaction. You'll often make your tool's visible mesh or main part the 'Handle'. Without it, your carefully crafted weapon or gadget would just float or fall, looking super awkward. So, always make sure you've got that 'Handle' in place; it's the bridge between your tool and the player's avatar. Give it a try, it'll click!
A: That's a fantastic question, and it really highlights where the magic happens with Roblox tools! You absolutely *can* create a physical tool model without writing a single line of Lua code. You can design its appearance, size, and even give it different materials in Roblox Studio, and players can pick it up and hold it. However, if you want that tool to *do* anything interactive – like swing, shoot, heal, or change the environment – then yes, Lua scripting becomes necessary. The script tells the tool *how* to behave. So, for a purely decorative item, no script needed. For anything with functionality, Lua is your best friend. It’s like building a car; you can make the body, but you need an engine (the script) for it to actually drive. Don't be scared of Lua; it opens up a world of possibilities!
A: This is a super practical question, and it's something every developer needs to know! The most common and direct way for players to get a tool at the start of a game is to place the 'Tool' object inside the 'StarterPack' service in your Explorer window. Any tool you put here will automatically be given to a player when they join your game, and whenever they respawn. If you want players to find tools in the game world, you can simply place the 'Tool' object (containing its 'Handle' and scripts) directly into the 'Workspace'. Players can then walk over it to pick it up. For more advanced scenarios, you can use scripts to 'give' players tools from 'ServerStorage' or 'ReplicatedStorage' based on events or purchases. Start with 'StarterPack' for simplicity, and then experiment!
Intermediate / Practical & Production
- Q: How do I make my tool do something when a player clicks with it in Roblox?
- Q: What's the difference between a Script and a LocalScript when making a tool?
- Q: How can I add custom animations to my Roblox tool when a player uses it?
- Q: My tool falls apart when I pick it up. How do I keep all its parts together?
- Q: How can I make my tool only usable by certain players or at certain times?
- Q: My tool causes lag. What are common optimization tips for Roblox tools?
A: Alright, this is where your tool really starts to come alive! To make your tool respond to clicks, you'll need to add a 'Script' (or a 'LocalScript' for client-side effects) directly inside your 'Tool' object. Inside that script, you'll want to connect to the 'Activated' event of the tool. It's a bit like telling the tool, 'Hey, when someone activates you, do this!' Your code will look something like `tool.Activated:Connect(function() ... end)`. Within that function, you'll write all the actions you want to happen: playing a sound, creating a part, dealing damage, etc. Remember to put a `wait()` or a cooldown if you don't want it to spam. This event is the gateway to almost all interactive tool functionality. You're effectively giving your tool a brain to react to player input! Keep experimenting with different effects inside that function.
A: Oh, this is a classic Roblox scripting puzzle, and it’s super important for making your tools work efficiently and securely! A 'Script' runs on the server, meaning whatever it does is seen and processed by everyone in the game. It's best for things like changing game state, dealing damage, or creating objects that everyone needs to see consistently. A 'LocalScript,' on the other hand, runs only on the player's client – just their computer. It's perfect for visual effects, sounds, animations that only that player needs to see or hear immediately, or handling player input. Think of it this way: server scripts handle the 'truth' of the game, while local scripts handle the 'experience' for an individual player. Often, you'll use both: a LocalScript for instant feedback to the player (like an animation) and then communicate with a Script (via RemoteEvents) for server-side actions (like actually dealing damage). Get comfortable with this distinction; it's a game-changer!
A: Adding custom animations is where your tools really start to feel polished and professional, giving them that extra 'oomph'! First, you'll need to create your animation using Roblox Studio's built-in Animation Editor. Once you're happy with it, export it to Roblox and grab its Asset ID. Then, inside your 'Tool' object, you'll place an 'Animation' instance (not a script, just an Animation object!) and set its 'AnimationId' property to the ID you just got. In your LocalScript (because animations are primarily a client-side visual effect!), you'll load this animation onto the player's Humanoid and then play it when the tool is activated. You'll often want to make sure the animation plays smoothly and stops correctly, so handle `tool.Activated` and `tool.Unequipped` events. It’s all about making that tool feel responsive and dynamic in the player's hands. Keep practicing your animation timing, and your tools will look fantastic!
A: Ugh, that's incredibly frustrating when your carefully assembled tool just disintegrates! I've been there, and it's usually a simple fix. The key here is proper 'welding' or using 'Motor6Ds' to connect all the parts of your tool to its 'Handle'. If parts aren't properly connected, physics will take over, and they'll just fall apart. The easiest way is to use a 'WeldConstraint' for static connections. Select all parts of your tool (excluding the Handle initially), then click 'Model' -> 'Service' -> 'Weld'. Then, select the Handle and the main part you want to connect to it and click 'Weld' again. For more complex, animated parts, you'll look into 'Motor6Ds' between your 'Handle' and other parts, especially if you plan on animating them relative to the hand. Make sure everything is anchored to the 'Handle' if you want it to move as one unit. You'll get it to stick together beautifully!
A: This is a great way to add depth and control to your game, whether for special abilities or level progression! To restrict tool usage, you'll typically use a 'Script' (server-side, for security) inside your 'Tool' object. When the `tool.Activated` event fires, the script gets a reference to the 'player' who activated it. You can then check conditions like `player.leaderstats.Level.Value >= 10` or `player.MembershipType == Enum.MembershipType.Premium`. You could also check `game.Lighting.TimeOfDay` for time-based restrictions. If the conditions aren't met, you simply return from the function early, maybe even sending a message to the player explaining why they can't use it. For inventory management, consider storing tools in 'ServerStorage' and only giving them to players via a server script when they earn or purchase them. This adds a fantastic layer of game design!
A: Laggy tools are a player's worst nightmare, and optimizing them is a crucial skill! The biggest culprits are often excessive physics calculations, too many `while true do` loops without sufficient `wait()`, or creating/destroying too many instances rapidly. Here’s the drill: first, try to keep your tool's part count low and union complex meshes where possible. Second, use 'LocalScripts' for purely cosmetic effects like particles or sounds that only the activating player needs to see; this offloads work from the server. Third, implement cooldowns and debounces to prevent rapid activation. Fourth, avoid expensive operations inside `RunService.Heartbeat` or `while true do` loops; if you must use them, ensure there's a `task.wait()` or `RunService.Stepped:Wait()` to prevent hogging resources. Lastly, destroy any instances (like projectiles or explosions) that are no longer needed after a short delay. A little bit of careful scripting goes a long way to smooth gameplay!
Advanced / Research & Frontier
- Q: How do I implement a custom inventory system that interacts with my tools outside of StarterPack?
- Q: What are advanced techniques for creating unique tool abilities, like a grappling hook or a teleportation device?
- Q: How can I protect my advanced tool scripts from exploiters and cheaters?
- Q: What's the best way to handle tool data persistence, like upgrades or custom configurations?
- Q: How can I integrate third-party assets or modules into my Roblox tools efficiently?
A: This is a super common and powerful advanced technique for creating unique game experiences! Instead of relying solely on 'StarterPack', you'll typically manage tools yourself using 'ServerStorage' for the master copies of your tools. When a player acquires a tool (e.g., buys it from a shop, finds it), a 'Server Script' will clone the tool from 'ServerStorage' and parent it to the player's 'Backpack'. To display it visually in a custom UI, a 'LocalScript' can observe changes in the player's 'Backpack' (using `ChildAdded` and `ChildRemoved` events) and update a 'GUI' that shows tool icons. When a player clicks a UI button, that 'LocalScript' would use a 'RemoteEvent' to tell the 'Server Script' to activate or equip the corresponding tool. This gives you total control over tool acquisition, storage, and display, creating a much more immersive and game-specific inventory feel. It’s a bit of a dance between client and server, but so worth it!
A: Now we're talking about really pushing the boundaries of tool design – this is where the fun truly begins! For a grappling hook, you're looking at raycasting from the player's camera to detect a surface. If hit, you'll use 'BodyVelocity' or 'LinearVelocity' to pull the player towards that point, often combined with 'WeldConstraints' or 'SpringConstraints' to simulate the rope. For teleportation, raycasting is also key to determine the target location. You then manipulate the player's 'HumanoidRootPart.CFrame' (or 'Position') directly, often with some cool visual effects like particles or a fading screen for immersion. These techniques involve a deep understanding of physics, CFrame manipulation, and spatial awareness. You might also want to incorporate `RunService` events for continuous updates or complex movement. Don't be afraid to break down the ability into smaller, manageable parts; each complex tool is just a series of smaller, simpler actions stitched together. Dream big, then build it piece by piece!
A: Protecting your game from exploiters is a constant battle in Roblox development, and it's absolutely vital for fair play. The golden rule is: **never trust the client.** This means any critical game logic – like damage calculation, item spawning, or player stats changes – *must* be handled by 'Server Scripts'. If a LocalScript tells the server, 'I hit PlayerB for 100 damage,' an exploiter can just send that message without actually hitting anything. Instead, your LocalScript should only send input (e.g., 'I activated my sword at these coordinates'). The 'Server Script' then validates everything: Is the player within range? Is the tool on cooldown? Is the target valid? This 'server-side validation' is your strongest defense. Use 'RemoteEvents' for client-to-server communication, and always sanitize any data received from the client. It's a bit more work up front, but it pays off hugely in game integrity. Stay vigilant, and keep learning new security practices!
A: Data persistence for tools adds an incredible layer of progression and personalization to your game, making players feel truly invested! The best approach involves using Roblox's 'DataStoreService'. When a player acquires or upgrades a tool, you'll want to save its unique properties (e.g., 'damageLevel', 'skinId', 'durability') as a table within their saved data. This should always be done via a 'Server Script' to prevent client-side manipulation. When the player rejoins the game, your 'Server Script' will load this saved data. It then creates the tool(s) for the player, applying all the saved attributes before parenting them to the player's 'Backpack'. You can store a list of owned tool IDs, or a dictionary where each key is a tool ID and its value is another dictionary of its custom stats. Remember to use `pcall` for DataStore calls to handle potential errors gracefully. This allows players to carry their progress and customizations across sessions. It's powerful stuff!
A: Integrating third-party assets or modules is a fantastic way to accelerate development and leverage the community's innovations, saving you tons of time! The most common method is to 'Insert' the module (often found as a 'Model' or 'ModuleScript' on the Roblox marketplace) directly into your 'Tool' object or a 'ModuleScript' in 'ReplicatedStorage' or 'ServerStorage' (depending on if it's client-side or server-side functionality). Then, within your tool's script, you can `require()` that module. For example, `local MyModule = require(tool.MyModuleScript)`. This allows you to call functions and access variables defined within that module. Always test third-party assets thoroughly in an isolated environment first to ensure they are secure, performant, and don't conflict with your existing code. Read documentation carefully and check for updates. Using well-vetted modules for things like tweening, particle effects, or advanced UI can dramatically enhance your tool's capabilities without reinventing the wheel. Smart use of modules is a hallmark of an efficient developer!
Quick Human-Friendly Cheat-Sheet for This Topic
- Always name the main part of your tool 'Handle' for it to attach correctly.
- Use 'WeldConstraints' to keep all tool parts together – no more falling apart!
- 'LocalScripts' are for player-specific visuals (animations, sounds), 'Scripts' for game-wide logic (damage, data saving).
- Protect your tools by doing all critical checks and actions on the server.
- Implement cooldowns and debounces to prevent spamming and improve performance.
- Use 'DataStoreService' with server scripts to save tool upgrades and customizations.
- Don't be afraid to experiment! Breaking down complex ideas into smaller steps makes it manageable.
Learn Roblox Studio tool creation. Master Lua scripting for custom tools. Understand CFrame and event handling. Design unique interactive in-game items. Implement advanced tool functionalities. Optimize player experience with custom tools. Debug and refine your Roblox tool projects. Discover trending tool design principles.
35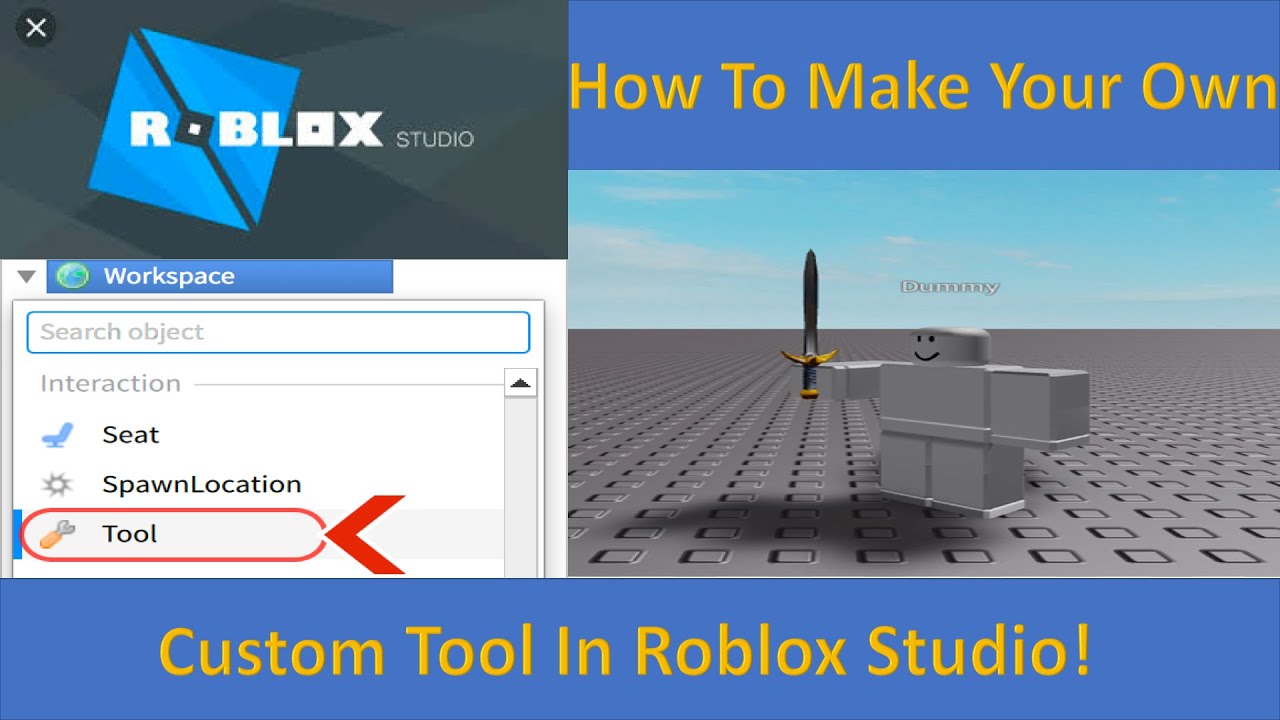


How To Make A Tool In Roblox Studio YouTube . How To Make A Tool In Roblox Studio YouTube . How To Make Team Only Tools Inside Of Roblox Studio YouTube . Roblox Studio HOW TO MAKE A TOOL GIVER ICEYDEV YouTube . How To Make A Working Tool In Roblox Studio YouTube


How To Make A Tool In Roblox Studio Beginner S Guide YouTube . How To Use TOOLS In Roblox Studio YouTube . How To Make A Tool In Roblox Studio YouTube . How To Make A Tool In Roblox Studio YouTube . How To Make TOOL SHOP Roblox Studio Tutorial YouTube


How To Create A Tool In Roblox Studio Beginner Tutorial 2025 YouTube . How To Make Tools In Roblox Studio YouTube . How To Make A Roblox Tool Roblox Studio Tutorial YouTube . How To Make A Tool Gamepass In Roblox Studio Tutorial YouTube . Tutorial How To Make Tool In Roblox Studio YouTube


How To Make Any Model Into A Tool Roblox Studio YouTube . How To ANIMATE TOOLS On Roblox YouTube . How To Make A Tool In Roblox Studio Roblox Studio Tutorial YouTube . How To Make A Tool In Roblox YouTube . How To Make A TOOL GAMEPASS In Roblox Studio YouTube


How To Convert Any Model Into Tool Roblox Studio YouTube . How To Make A Tool Roblox Studio Tutorial YouTube . BEST WAY To Make Tools On Roblox For Free Beginner YouTube . How To Make A TOOL Roblox Studio Tutorial YouTube . How To Make A Tool With Multiple Parts Roblox YouTube


How To Make A Tool In Roblox Studio YouTube . How To Create Tools And Animate Them TUTORIAL Community Tutorials 2 690x400 . How To Make A Tool On Roblox Playbite How To Make A Tool On Roblox . How To Create A Tool In Roblox Studio Working 2021 YouTube . How To Create A Custom Tool Giver Roblox Studio 2024 YouTube


How To Make A Tool In Roblox Studio And Adjust The Grip Of The Tool . How To Make A Roblox Tool YouTube . Roblox How To Build How To Make Tools The Tool System YouTube . How To Make A Tool Giver ROBLOX Studio YouTube . How To Animate A Tool Roblox Studio Updated YouTube